Master the basics of Reactive Forms in Angular by building five different forms from scratch. 1093 words.
Last Updated
As part of the Angular Basics Series, we will be taking a comprehensive look at Reactive Forms from the ground up. The official documentation is a very long read, so this guide is designed to help you master the basics by focusing on the bare essential concepts you must know.
Reactive Forms for PROs
1. Reactive Forms Fundamentals
At this point, it is assumed that you have an existing Angular project started with the CLI v6+. I also highly recommend using Angular Material if you plan on building complex forms. It has a ton of fancy UI elements for form validation out of the box. You won’t see Material Components in the code below, but it is included in the full source on Github.
To get started, we need to import the ReactiveFormsModule into the app.module.ts.
import { ReactiveFormsModule } from '@angular/forms';

@NgModule({
  declarations: [
    AppComponent,
  ],
  imports: [
    BrowserModule,
    ReactiveFormsModule,
  ],
  bootstrap: [AppComponent]
})
export class AppModule { }
What is a Reactive Form?
A reactive form is just an HTML form that’s been wired up with RxJS to manage its state as a realtime stream. This means you can listen to changes to its value as an Observable and react accordingly with validation errors, feedback, database operations, etc.
Minimal Example
When getting started with Reactive Forms, there are really only three classes that you need to know about.
- FormControl - An individual form input, checkbox, select, textarea, etc.
- FormGroup - A group of form fields that can be manipulated and validated together.
- FormBuilder - A service that helps you build FormGroups easily.
FormGroup and all other controls are derived from a base class called `AbstractControl`. Knowing this is not essential, but might come into play if you need to extend the base functionality of Reactive Forms.
In your typescript, you inject the FormBuilder service in the constructor, then use it to define a FormGroup. Think of a group as a collection of form inputs unified as a reactive object.
myForm: FormGroup;

constructor(private fb: FormBuilder) { }

ngOnInit() {
  this.myForm = this.fb.group({
    email: '',
    message: ''
  })
}
Bind this data structure to your HTML and your form is now reactive, yay!
<form [formGroup]="myForm">
  <input formControlName="email">
  <input formControlName="message">
</form>
Checkout the full basic form example
2. Nested Forms
In the real world, you might find yourself dealing with very large nested forms that have dozens of controls. Those cases often call for nested form groups. You can reuse a form group inside of another and Angular will automatically compose them into a single object.
Nested Form Example
ngOnInit() {

  const phone = this.fb.group({
    area: [],
    prefix: [],
    line: [],
  })

  this.myForm = this.fb.group({
    email: '',
    homePhone: phone,
    cellPhone: phone,
  })

}
Make note of the formGroupName attribute that wraps the child form controls.
<form [formGroup]="myForm">
  <input formControlName="email">

    <h4>Cell Phone</h4>

    <div formGroupName="cellPhone">
      <input formControlName="area">
      <input formControlName="prefix">
      <input formControlName="line">
    </div>

    <h4>Home Phone</h4>

    <div formGroupName="homePhone">
      <input formControlName="area">
      <input formControlName="prefix">
      <input formControlName="line">
    </div>

</form>
Checkout the full nested form example
3. Dynamic Forms with FormArray

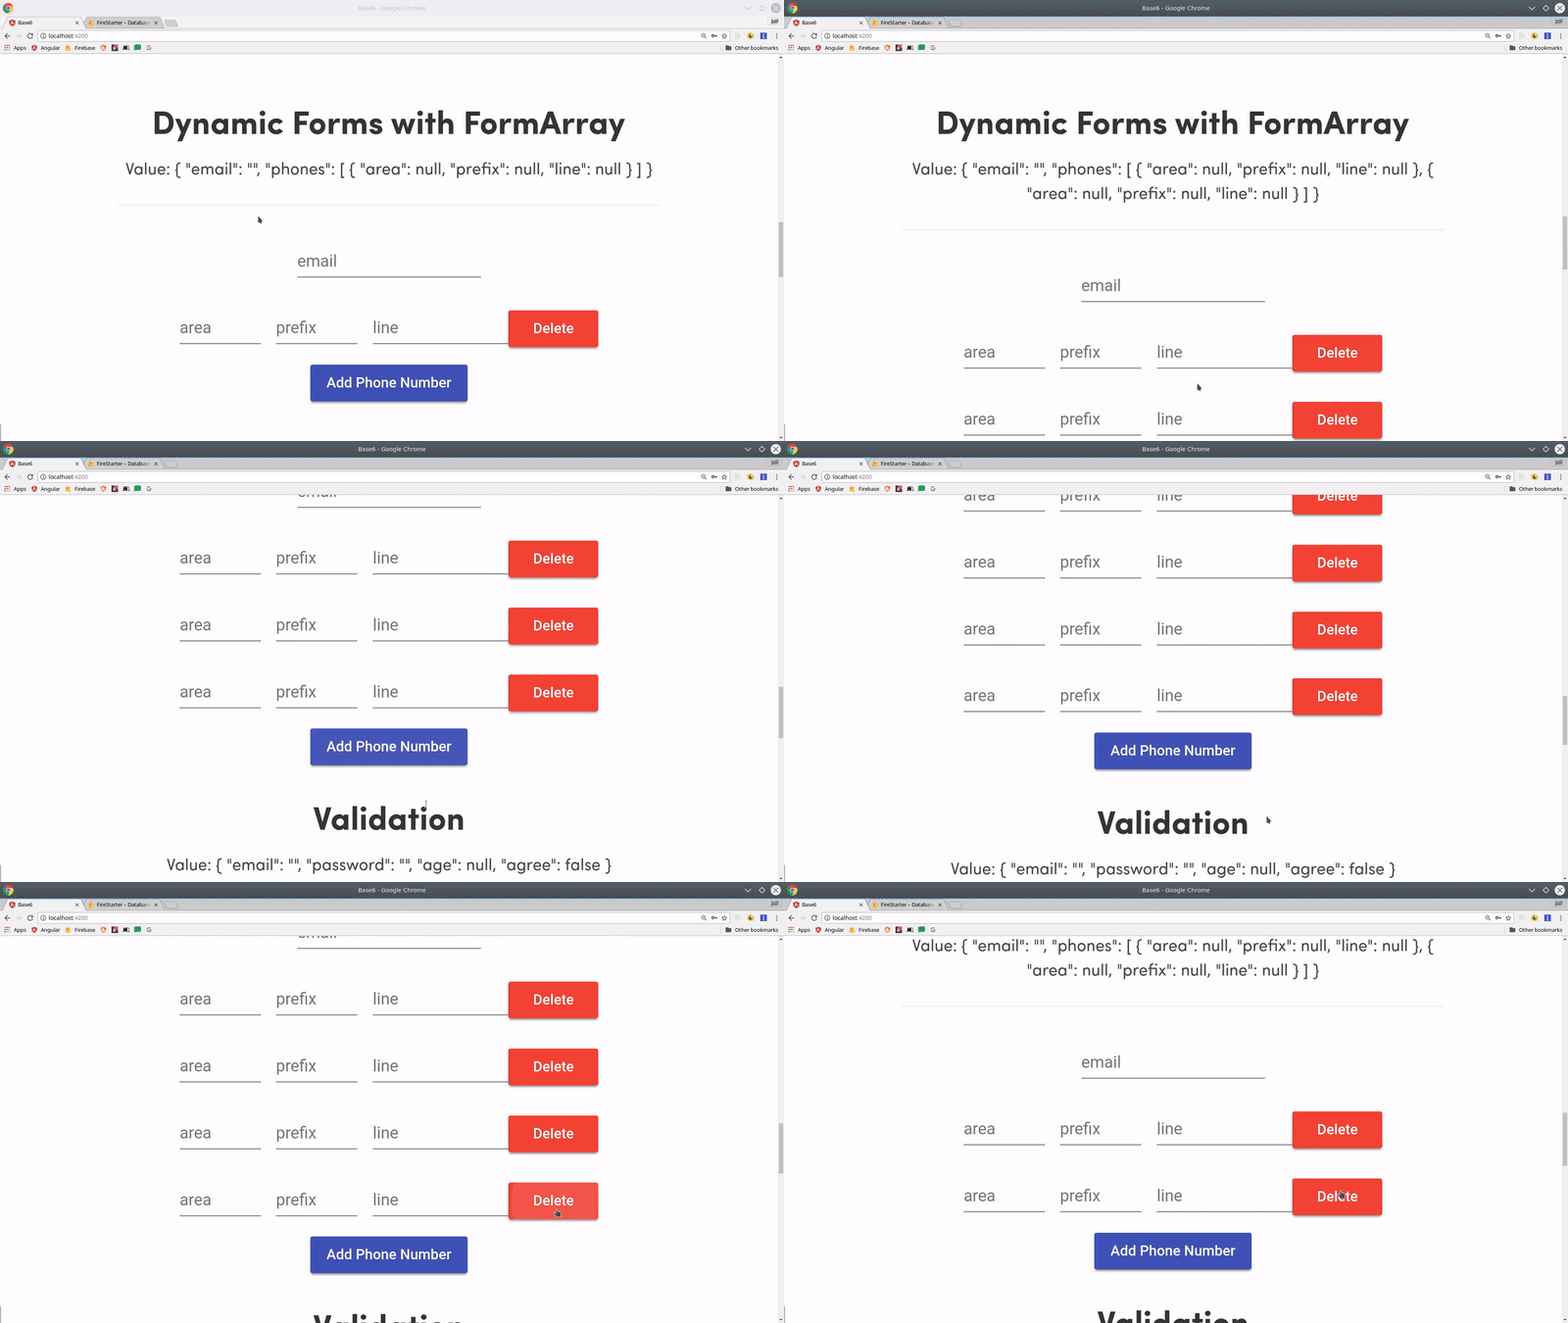
demo of Angular FormArray
Let’s imagine we want our users to include multiple phone numbers on their account dynamically. Harding coding a nested object would impossible to maintain, but we can allow the user to push multiple groups to a FormArray.
Rather than define the form groups one-by-one, we let the user click a button that will push a new group to the FormArray. Each group in this array has an index, so we can modify and delete these forms based on their index position.
FormArray Example
ngOnInit() {
  this.myForm = this.fb.group({
    email: '',
    phones: this.fb.array([])
  })

}

get phoneForms() {
  return this.myForm.get('phones') as FormArray
}

addPhone() {

  const phone = this.fb.group({
    area: [],
    prefix: [],
    line: [],
  })

  this.phoneForms.push(phone);
}

deletePhone(i) {
  this.phoneForms.removeAt(i)
}
<form [formGroup]="myForm">

  <div formArrayName="phones">

      <div *ngFor="let phone of phoneForms.controls; let i=index"
            [formGroupName]="i">

          <input formControlName="area">
          <input formControlName="prefix">
          <input formControlName="line">

          <button (click)="deletePhone(i)">Delete</button>

      </div>
  </div>

  <button (click)="addPhone()">Add Phone Number</button>

</form>
Checkout the full array form example
4. Form Validation
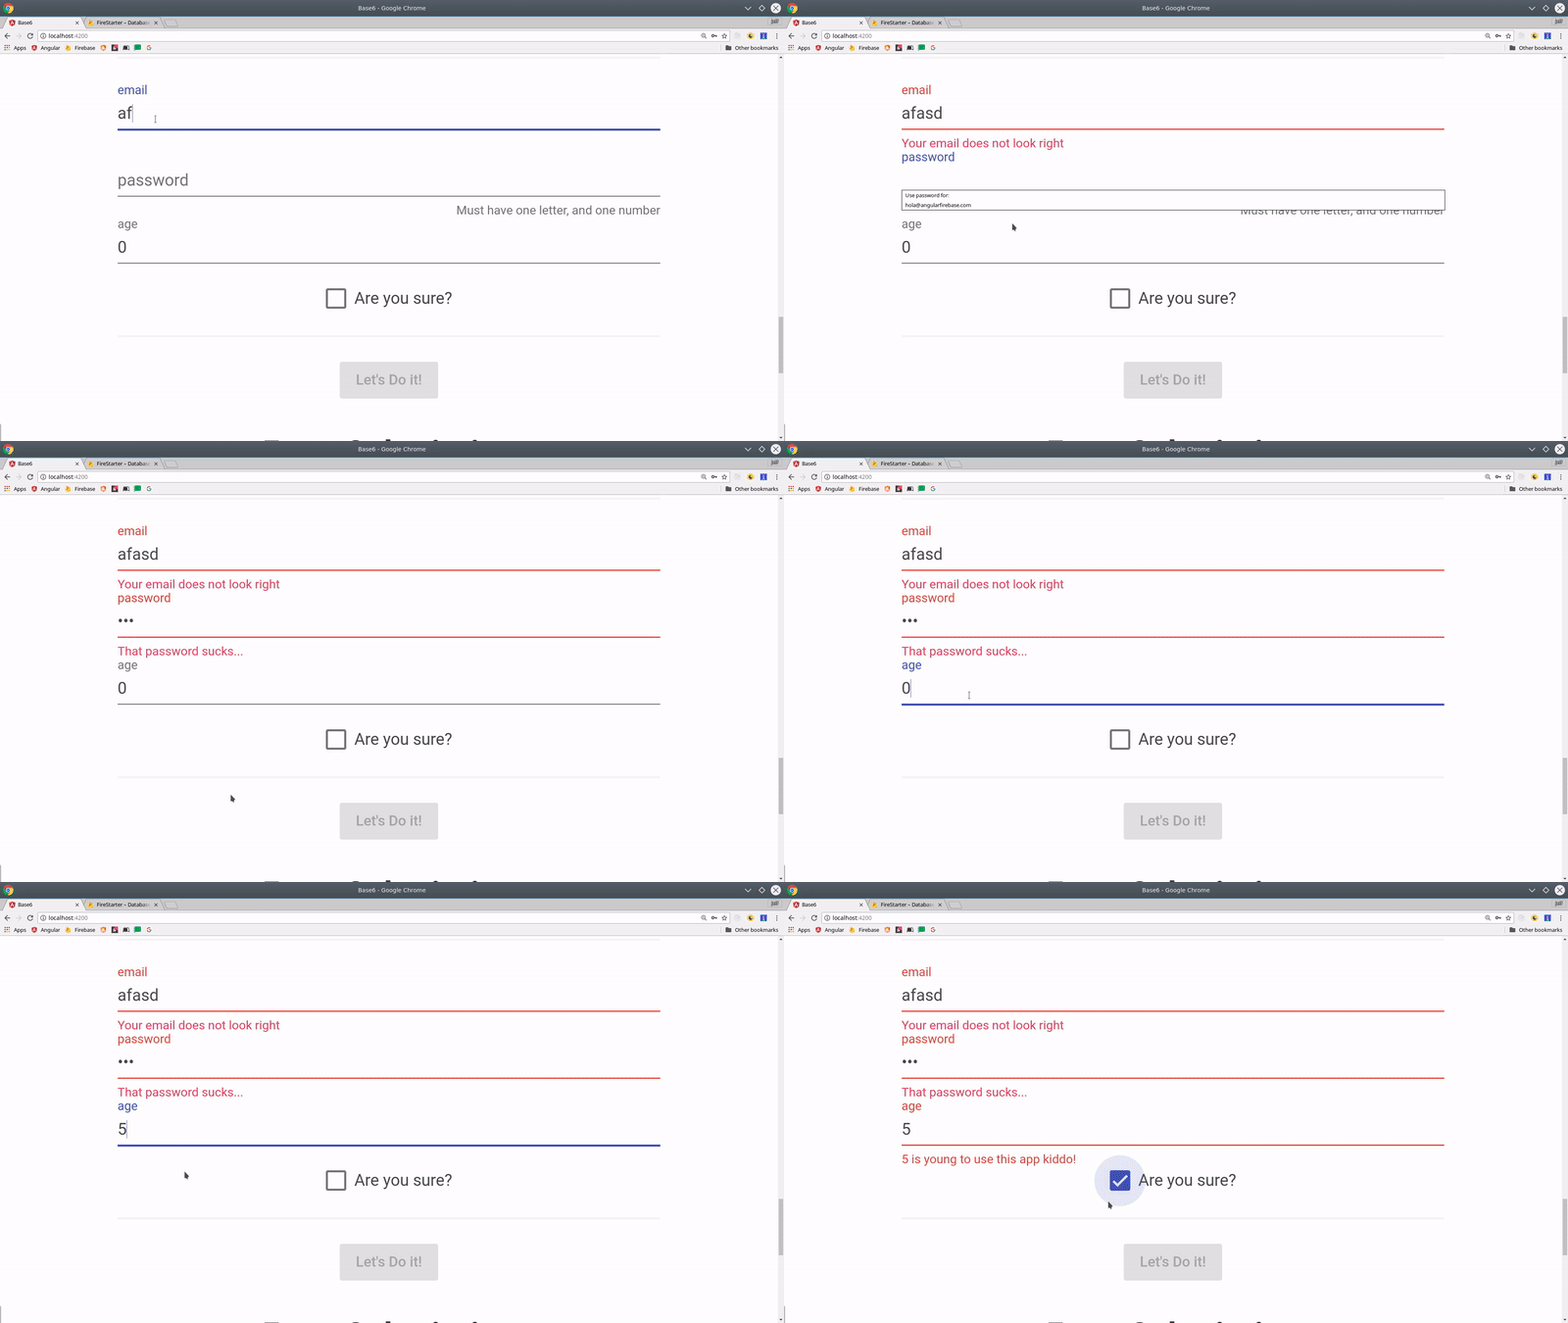
Almost all forms need to be validated before they can be confidently submitted to a backend database. Angular Validators mirror the functionality of plain HTML form validators. You can chain multiple validators together in your reactive form and all must pass to mark that control as valid.

Demo of form validation
Validated Form Example
  ngOnInit() {
    this.myForm = this.fb.group({
      email: ['', [
        Validators.required,
        Validators.email
      ]],
      password: ['', [
        Validators.required,
        Validators.pattern('^(?=.*[0-9])(?=.*[a-zA-Z])([a-zA-Z0-9]+)$')
      ]],
      age: [null, [
        Validators.required,
        Validators.minLength(2),
        Validators.min(18),
        Validators.max(65)
      ]]
    });
  }

  get email() {
    return this.myForm.get('email');
  }

  get password() {
    return this.myForm.get('password');
  }

  get age() {
    return this.myForm.get('age');
  }
}
In the HTML, we can inspect the validation state on the entire form or individual controls to display custom error messages and obtain fine-grained control over the form’s behavior.
<form [formGroup]="myForm">

  <input formControlName="email">
  <span *ngIf="email.invalid && email.touched">
      Your email does not look right
  </span>


  <input formControlName="password">
  <span *ngIf="password.invalid && password.touched">
      That password sucks...
  </span>

  <input formControlName="age">
  <span *ngIf="age.errors?.min && age.touched">
      {{ age.errors.min.actual }} is young to use this app kiddo!
  </span>
  <span *ngIf="age.errors?.max && age.touched">
      {{ age.errors.max.actual }} is too you old to use this app gramps!
  </span>

  <button [disabled]="myForm.invalid">Let's Do it!</button>

</form>
Checkout the full validated form example
5. Submitting Reactive Forms
Lastly, you might want to submit your form data to some backend database - I can think of no better place than Cloud Firestore. Reactive forms have a special ngSubmit event that captures the normal form submit event. You can listen to this event in the HTML, then fire an event handler that saves the current data to the backend.
The snippet below assumes that you have AngularFire installed in your project
Submitted Form to Firestore Example
import { Component, OnInit } from '@angular/core';
import { FormBuilder, FormGroup, Validators } from '@angular/forms';
import { AngularFirestore } from 'angularfire2/firestore';

@Component({...})
export class SubmitFormComponent implements OnInit {

  myForm: FormGroup;

  // Form state
  loading = false;
  success = false;

  constructor(private fb: FormBuilder, private afs: AngularFirestore) { }

  ngOnInit() {
    this.myForm = this.fb.group({
      email: ['', Validators.required],
      message: ['', Validators.required]
    })
  }

  async submitHandler() {
    this.loading = true;

    const formValue = this.myForm.value;

    try {
      await this.afs.collection('contacts').add(formValue);
      this.success = true;
    } catch(err) {
      console.error(err)
    }

    this.loading = false;
  }


}
Notice how we’re running the submitHandler() on the ngSubmit event.
<form [formGroup]="myForm" [hidden]="success" (ngSubmit)="submitHandler()">

  <input formControlName="email">
  <textarea formControlName="message"></textarea>

  <button [disabled]="myForm.invalid">Submit Form</button>

</form>

<div *ngIf="success">
    Yay! We received your submission
</div>
Checkout the full submitted form example.
The End
Reactive Forms are a truly awesome tool for developers once you get the hang of them.
